![RRA_Logo_For_email.png]](https://knowledge.rudolphresearch.com/hs-fs/hubfs/RRA_Logo_For_email.png?height=50&name=RRA_Logo_For_email.png)
Troubleshooting: Dirty Measurement Cell
Overview
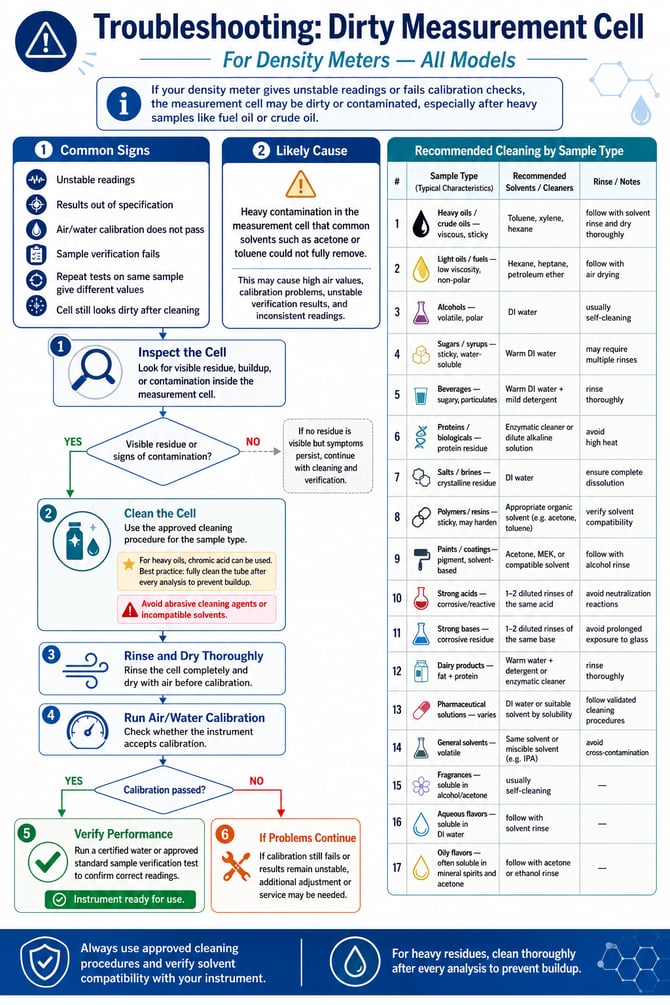
If your Density Meter is giving unstable readings or failing calibration checks, the measurement cell may be dirty or contaminated.
This can happen when testing heavy samples such as fuel oil or crude oil, especially if residue remains in the cell after normal cleaning.
Instrument
Model: All Models
Problem
The measurement cell is heavily contaminated and could not be fully cleaned using common solvents such as acetone and toluene.
This caused:
- High air measurement values
- Calibration problems
- Unstable verification results
- Inconsistent readings from the same sample
Common Signs of a Dirty Measurement Cell
You may notice one or more of these issues:
- Readings are unstable
- Results are out of specification
- Air/water calibration does not pass
- Sample verification fails (e.g. Water)
- Repeat tests on the same sample give different values
- The cell still looks dirty after cleaning
What to Do
Step 1: Inspect the measurement cell
Look for visible residue, buildup, or contamination inside the cell.
Step 2: Clean the cell
Use your approved cleaning procedure for heavy sample residue. For heavy oils, Chromic acid can be used and best practice is to fully clean the tube after every analysis to prevent buildup.
Warning: Avoid abrasives cleaning agents or solvents
|
Sample Type |
Typical Residue Characteristics | Recommended Cleaning Solution | Notes / Best Practice |
| Heavy oils / crude oils | Viscous, hydrophobic, sticky | Toluene, Xylene, Hexane | Follow with solvent rinse (e.g., toluene) and dry thoroughly |
| Light oils / fuels | Low viscosity, non-polar | Hexane, heptane, or petroleum ether | Fast evaporation; follow with air drying |
| Alcohols (e.g., ethanol) | Volatile, polar | Deionized (DI) water | Usually self-cleaning; minimal residue |
| Sugars / syrups | Sticky, water-soluble | Warm DI water | May require multiple rinses |
| Beverages (soft drinks, juice) | Sugary, possible particulates | Warm DI water + mild detergent | Rinse thoroughly to remove detergent |
| Proteins / biological samples | Proteinaceous, can adhere strongly | Enzymatic cleaner or dilute alkaline solution | Avoid high heat (can denature proteins further) |
| Salts / brines | Crystalline residue | DI water | Ensure complete dissolution |
| Polymers / resins | Sticky, may harden | Appropriate organic solvent (e.g., acetone, toluene) | Verify solvent compatibility with instrument |
| Paints / coatings | Pigmented, solvent-based | Acetone, MEK, or paint-compatible solvent | Follow with alcohol rinse to remove residue |
| Acids (strong) | Corrosive, reactive | 1-2 diluted solutions of the same acid. We do not want any neutralization reaction occurring within the U-tube. | Use caution to prevent reactions |
| Bases (strong alkali) | Corrosive, slippery residue | 1-2 diluted solutions of the same base. We do not want any neutralization reaction occurring within the U-tube. | Avoid prolonged exposure to glass components |
| Dairy products | Fat + protein | Warm water + detergent or enzymatic cleaner | Rinse thoroughly to avoid film |
| Pharmaceutical solutions | Varies (often aqueous with actives) | DI water or suitable solvent based on solubility | Follow validated cleaning procedures if required |
| Solvents (general) | Typically volatile | Same solvent or miscible solvent (e.g., IPA) | Ensure no cross-contamination |
| Fragrances | Oil based components | Soluble alcohol and acetone | Usually self cleaning |
| Aqueous Flavors | Sticky deposits | Soluble in DI Water (e.g. acetone, ethanol) | Follow with solvent rinse |
| Oily Flavors | Hydrophobic film | Soluble most of the times in Mineral Spirit and Acetone | Follow with solvent rinse (e.g. Acetone, Ethanol) |
Step 3: Rinse and dry thoroughly
After cleaning, rinse the cell completely and dry it with air before running calibration.
Step 4: Run air/water calibration
Check whether the instrument now accepts the calibration.
Step 5: Run a water or your standard sample verification test
Use certified water or your approved verification standard to confirm the instrument is reading correctly.
Step 6: If the problem continues
If calibration still fails or results remain unstable, additional adjustment or service may be needed.
Troubleshooting Flowchart
How can we further assist you?
Give us a call, we are happy to help! (973) 584-1558 Monday - Friday 8:30AM - 5PM EST or open a service ticket. Request a quote for a field service visit or replacement part: